iOS 开发学习,各种记录。
很多东西都比较简单,但是很多东西都容易忘记,或者自己曾经遇到过但是忘记了当时是如何处理的,使得再次遇到依旧会浪费很多时间,所以不管难易,都记录下来,避免二次伤害。
LLDB
iOS开发过程中Bug不可能少,最重要的如何快速的定位Bug的原因,不能每更改一行代码,运行整个App来查看效果,那样效率太过于低下。
Dancing in the Debugger — A Waltz with LLDB这篇文章很不错,也学到了很多。
chiselfacebook出品必属精品,更加方便的使用lldb。
建议有时间可以看chisel的源码,Objective-C、LLDB、Python一起学。
Xcode
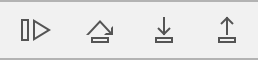
Continue
程序继续执行。
1 | (lldb) process continue |
‘c’ is an abbreviation for ‘process continue’
step over
以黑盒的形式执行一行代码。
1 | (lldb) thread step-over |
‘next’ is an abbreviation for ‘thread step-over’
‘n’ is an abbreviation for ‘thread step-over’
step into
进入具体的函数实现。
1 | (lldb) thread step-in |
‘step’ is an abbreviation for ‘thread step-in’
‘s’ is an abbreviation for ‘thread step-in’
step out
跳出具体的函数实现。
1 | (lldb) thread step-out |
‘step’ is an abbreviation for ‘thread step-in’
‘s’ is an abbreviation for ‘thread step-in’
Commands
breakpoint
断点管理。
set
Sets a breakpoint or set of breakpoints in the executable.
f
-f 指定文件
l
-l 指定行数
F
Set the breakpoint by fully qualified function names. For C++ this means namespaces and all arguments, and for Objective C this means a full function prototype with class and selector. Can be repeated multiple times to make one breakpoint for multiple names.
-F 指定全名
1 | (lldb) breakpoint set -F "-[NSException raise]" |
也称之为符号断点。
c
The breakpoint stops only if this condition expression evaluates to true.
-c 指定条件
command
Commands for adding, removing and listing LLDB commands executed when a breakpoint is hit.
add
1 | (lldb) breakpoint command add 1 |
expression
-O
-O ( –object-description )
Display using a language-specific description API, if possible.
1 | (lldb) expression -O -- <expr> |
‘po’ is an abbreviation for ‘expression -O –’
1 | (lldb) expression -- <expr> |
‘print’ is an abbreviation for ‘expression –’
二进制、十六进制。。。等完整打印格式
frame
Commands for selecting and examing the current thread’s stack frames.
info
List information about the current stack frame in the current thread.
thread
return
Prematurely return from a stack frame, short-circuiting execution of newer frames and optionally yielding a specified value. Defaults to the exiting the current stack frame. Expects ‘raw’ input (see ‘help raw-input’.)
1 | (lldb) thread return [<expr>] |
直接返回指定的值。
process
continue
Continue execution of all threads in the current process.
interrupt
Interrupt the current target process.
memory
Commands for operating on memory in the current target process.
read
Read from the memory of the current target process.
Convenience
1 | # 打印视图层级 |
Refrence
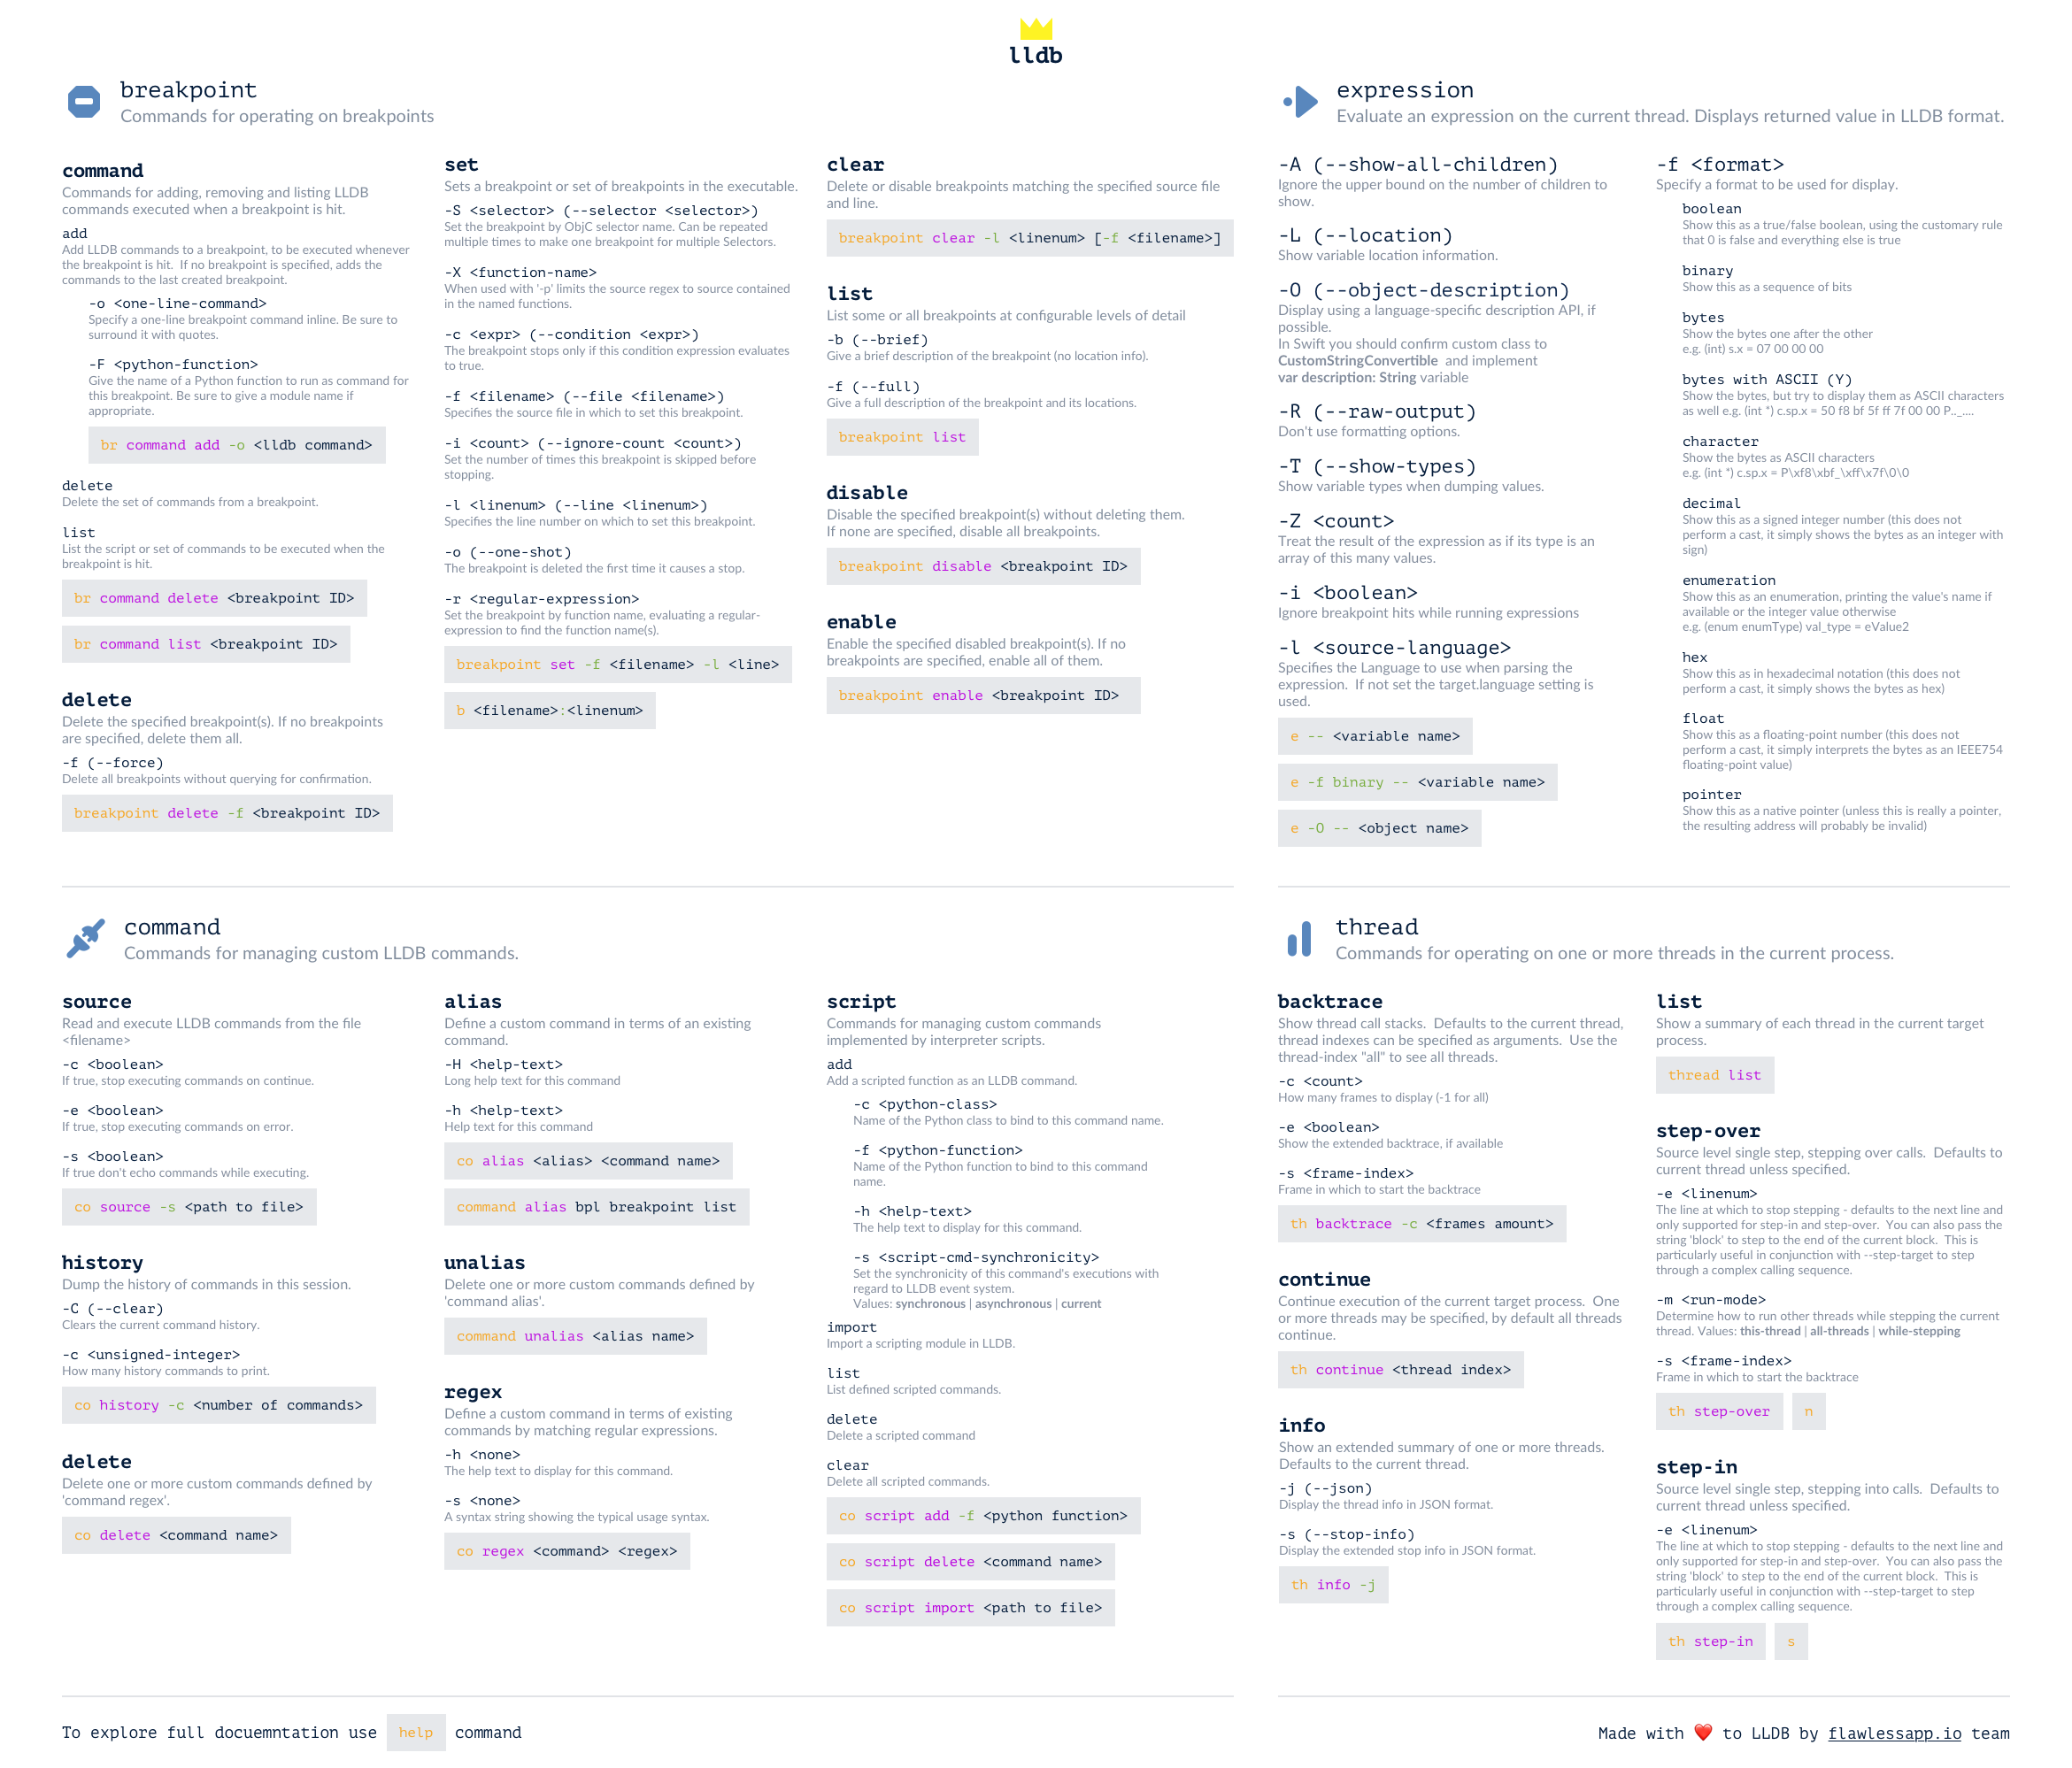
Signature
整个流程:
- 在你的 Mac 开发机器生成一对公私钥,这里称为公钥L,私钥L。L:Local
- 苹果自己有固定的一对公私钥,跟上面 AppStore 例子一样,私钥在苹果后台,公钥在每个 iOS 设备上。这里称为公钥A,私钥A。A:Apple
- 把公钥 L 传到苹果后台,用苹果后台里的私钥 A 去签名公钥 L。得到一份数据包含了公钥 L 以及其签名,把这份数据称为证书。
- 在苹果后台申请 AppID,配置好设备 ID 列表和 APP 可使用的权限,再加上第③步的证书,组成的数据用私钥 A 签名,把数据和签名一起组成一个 Provisioning Profile 文件,下载到本地 Mac 开发机。
- 在开发时,编译完一个 APP 后,用本地的私钥 L 对这个 APP 进行签名,同时把第④步得到的 Provisioning Profile 文件打包进 APP 里,文件名为 embedded.mobileprovision,把 APP 安装到手机上。
- 在安装时,iOS 系统取得证书,通过系统内置的公钥 A,去验证 embedded.mobileprovision 的数字签名是否正确,里面的证书签名也会再验一遍。
- 确保了 embedded.mobileprovision 里的数据都是苹果授权以后,就可以取出里面的数据,做各种验证,包括用公钥 L 验证APP签名,验证设备 ID 是否在 ID 列表上,AppID 是否对应得上,权限开关是否跟 APP 里的 Entitlements 对应等。
上面的步骤对应到我们平常具体的操作和概念是这样的:
- 第 1 步对应的是 keychain 里的 “从证书颁发机构请求证书”,这里就本地生成了一对公私钥,保存的 CertificateSigningRequest 就是公钥,私钥保存在本地电脑里。
- 第 2 步苹果处理,不用管。
- 第 3 步对应把 CertificateSigningRequest 传到苹果后台生成证书,并下载到本地。这时本地有两个证书,一个是第 1 步生成的,一个是这里下载回来的,keychain 会把这两个证书关联起来,因为他们公私钥是对应的,在XCode选择下载回来的证书时,实际上会找到 keychain 里对应的私钥去签名。这里私钥只有生成它的这台 Mac 有,如果别的 Mac 也要编译签名这个 App 怎么办?答案是把私钥导出给其他 Mac 用,在 keychain 里导出私钥,就会存成 .p12 文件,其他 Mac 打开后就导入了这个私钥。
- 第 4 步都是在苹果网站上操作,配置 AppID / 权限 / 设备等,最后下载 Provisioning Profile 文件。
- 第 5 步 XCode 会通过第 3 步下载回来的证书(存着公钥),在本地找到对应的私钥(第一步生成的),用本地私钥去签名 App,并把 Provisioning Profile 文件命名为 embedded.mobileprovision 一起打包进去。这里对 App 的签名数据保存分两部分,Mach-O 可执行文件会把签名直接写入这个文件里,其他资源文件则会保存在_CodeSignature目录下。
概念:
- 证书:内容是公钥或私钥,由其他机构对其签名组成的数据包。
- Entitlements:包含了 App 权限开关列表。
- CertificateSigningRequest:本地公钥。
- p12:本地私钥,可以导入到其他电脑。
- Provisioning Profile:包含了 证书 / Entitlements 等数据,并由苹果后台私钥签名的数据包。
Device
http://www.blakespot.com/ios_device_specifications_grid.html
UIKit
UIWindow
backgroundColor如果不设置或者为透明色,则不响应不透明事件。
UIView
Touch Events
1.系统将触摸事件打包成UIEvent对象
2.UIApplication将事件传递给UIWindow
3.UIWindow调用hitTest方法。
point(inside:with:)
Returns a Boolean value indicating whether the receiver contains the specified point.
1 | func point(inside point: CGPoint, with event: UIEvent?) -> Bool |
判断触摸的点在不在该试图范围内。
hitTest(_:with:)
Returns the farthest descendant of the receiver in the view hierarchy (including itself) that contains a specified point.
1 | func hitTest(_ point: CGPoint, with event: UIEvent?) -> UIView? |
判断哪个视图响应事件
调用当前视图的func point(inside point: CGPoint, with event: UIEvent?) -> Bool判断触摸点是否在当前视图内。
false:直接返回nil,表示触摸点不在当前视图;
true:遍历并调用当前视图的子视图hitTest方法。如果所有的子视图hitTest都返回nil,则返回自身;如果有子视图返回不为空,则返回该子视图。
遍历是从当前视图的最顶层视图遍历到最底层视图,即从
subviews最后一个开始向前遍历。如果
isHidden为true,alpha为0,子视图超过父视图范围,则该视图的hitTest返回nil。当设置视图的
backgroundColor为clearColor的时候,虽然当前视图也是透明的,但是依旧将事件向子视图传递。
Animation
1 | /// 在一次开发中,当同时改变视图的位置和大小的时候,动画会出现异常。 |
当frame改变的时候transform会重设。
UIScrollView
UITableView
1 | self.tableView = [[UITableView alloc] initWithFrame:CGRectZero style:UITableViewStyleGrouped]; |
reloadData
How to keep UITableView contentOffset after calling reloadData
How to keep UITableView contentoffset after calling -reloadData
reloadData并不会调整offset
仅仅在Cell的高度为固定的状态,如果Cell是动态计算出来的就不一定了。如果Cell的高度是不固定的,那么他的
contentOffset也是不固定的,而是在滑动的过程中不断的计算出来。
具体的解决方式没有尝试过,别人提出的方式是用字典来缓存高度。
MJRefresh
解决下拉刷新无法回弹的问题
关于iOS11 上下拉刷新无法返回的问题,不关MJRefresh的事,解答
| Property | Detail | Available |
|---|---|---|
automaticallyAdjustsScrollViewInsets |
自动调节UIScrollView的contentInset |
iOS 7.0 ~ 11.0 |
contentInsetAdjustmentBehavior |
自动调节UIScrollView的contentInset |
iOS 11.0+ |
1 | // 关闭自动调节 |
1 | /// 如果有导航栏设置偏移量。 |
1 | /// 设置Cell的高度。 |
Summary
一个TableView中多种样式相似的Cell
当一个UITableView中有多种Cell,但是又差不多样式,最优雅的方式是使用继承方式来实现,不要用if、else来判断哪个Cell显示哪些内容。
1 | /** |
如果点击按钮Cell的样式改变直接
[tableView dequeueReusableCellWithIdentifier:[TwoButtonSampleTableViewCell reuseIdentifier] forIndexPath:indexPath];对应样式的Cell就OK了,避免过多的if、else。
动态显示
很多时候我们需要根据服务器返回的是否为空来动态显示内容,这个时候依旧用继承重写进行实现,在动态将相应的视图添加到父视图上,并修改约束。
优雅的唯一表示一个Cell
很多人在注册Cell的时候会写很多的字符串来注册,建议采用下面方式来进行。
1 | @interface UITableViewCell (ReuseIdentifier) |
1 | //MARK: - Identifier |
是不是优雅了很多呢?
UICollectionView
Horizontal refresh
仿照MJRefresh的结构来写的,至此也大致了解了MJRefresh的设计模式。
1 |
|
- 当调用同时调用reloadData和改变contentInset(回弹)的时候会出现抖动的问题,所以需要将改变contentInset放到下一个runloop中调用。
selected muti-selected
在这里我们使用UICollectionView来实现单选、多选,因为自带单选,我们只需要解决多选就可以了。
1 | /// UICollectionViewCell |
UICollectionViewFlowLayout
左对齐。
UICollectionViewLeftAlignedLayout
UITextView
UITextView with auto size.
如何在UIScrollView或者其子类中使用UITextView并自动计算高度,自动改变UIScrollView的offset。诸如此类的文章很多,在此总结自己的想法。
- 键盘谈起的时候判断是否遮挡UIScrollView中的UITextView,根据需要改变offset。
- 当UITextView换行的时候需要判断是否键盘是否再次挡住UITextView。
- Setting
1 | /// 设置约束,从上到下约束都需要是满的。 |
- Listening
1 | /// 监听键盘frame改变。 |
这里的参考点可以是这个textView,在
- (void)textViewDidChange:(UITextView *)textView中计算是否需要重新设置scrollView的contentOffset。
1 | CGFloat keyboardTopOffset = self.scrollView.bounds.size.height - keyBoardFrame.size.height; |
这样就会让指定的点关键点始终在键盘的上面。
Limit number of character
字符限制在很多场景都会用到,但是除了普通的汉字和ABC之外还有表情其他字符,这个时候单判断字符是会出现以下问题的。
- 表情这里比较坑,不同的表情占用的字符数量并不一定。有的占两个字符长度,有的占四个字符长度,有的占11个字符长度,所以单从(text.length)来限制,就会导致最少只能显示几个表情的问题。
- 如果检测是在输入的过程中,则会出现最后几个字还没有打出来,就直接截断,导致显示的是拼音。
- 复制粘贴也需要根据实际情况进行截断。
- 如果单从text.length来截取,可能会造成最后一个如果是表情,可能会出现错误符号。
我个人的解决办法是将ASCII作为一个字符,非ASCII作为两个字符。或者将汉字作为两个字符,其他作为一个字符。这样就不会出现汉字可以很多,表情只能输入几个的问题了。
1 | public extension UITextInput { |
1 | [self.text enumerateSubstringsInRange:NSMakeRange(0, self.text.length) |
markedTextRange
被标记的文本,这个东西基本上没次都不一样,由于输入的内容不一样,可能是中文,可能是英文,但是在回调中这些标记的文字也在self.text中,这部分文字由于可能存在没有输入完成,所以并不计入最终的内容。
1 | /// 获取被标记的文本。 |
Placeholder
UITtextView没有Placeholder着实难受,那就只能自己实现一个了。
1 | - (void)awakeFromNib { |
UISearchBar
1 | @implementation CustomSearchBar |
1 | self.searchBar = [CustomSearchBar new]; |
iOS11更改了搜索栏的样式,与其兼容新老版本不如自己写SearchBar
1 | @class SearchBar; |
UIDatePicker
日期选择器
1 | self.picker = [[UIDatePicker alloc] initWithFrame:CGRectMake(0, 40, KScreenWidth, 180)]; |
UINavigationBar
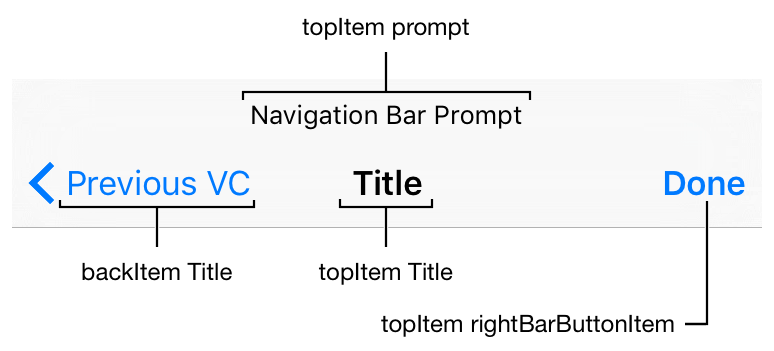
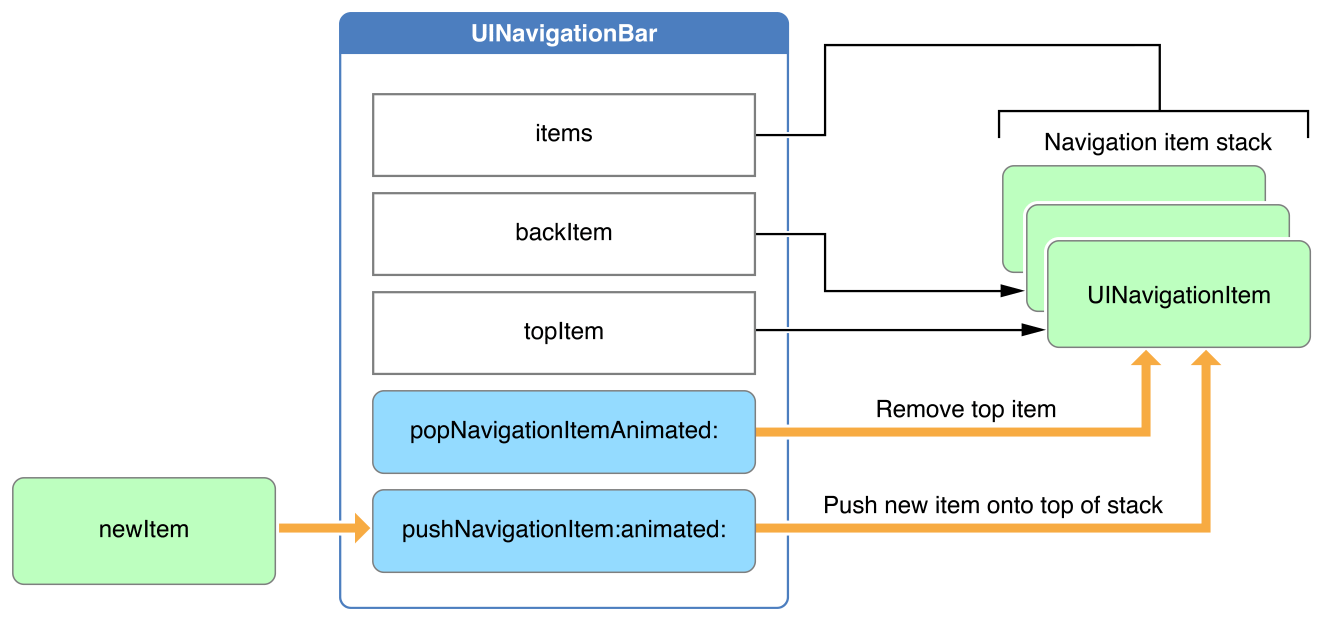
UINavigationItem
UIVisualEffectView
1 | /// 修改模糊背景颜色 |
UIViewController
Enable interactive pop gesture recognizer with custom back button
自定义返回按钮导致系统滑动手势失败解决。
1 | UIButton *backButton = [UIButton buttonWithType:UIButtonTypeCustom]; |
Transition
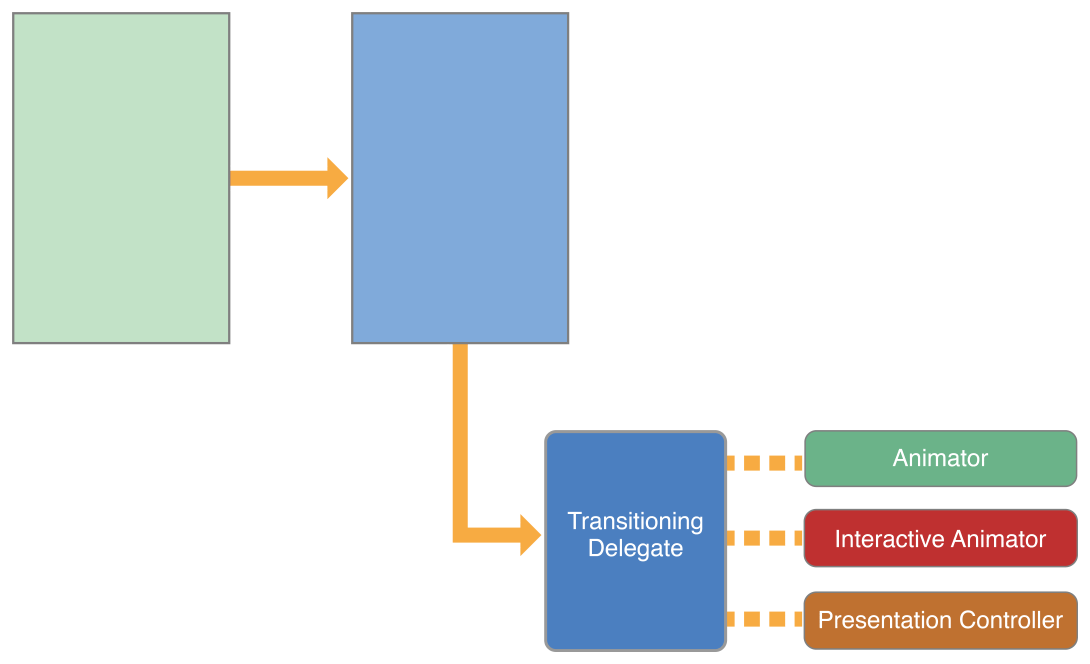
presente transition的默认过程是创建一个UIPresentationController,将prestatingViewController的rootViewController的subViewControllers压栈,将prestationController
1 | /// x.h |
- 如何动态弹出高度?意味着弹出的高度不是固定的,在弹出之前就应该算好高度,这无疑需要提前渲染,然后计算内容高度,然后弹出。在这里我想到了一种简便的方法:
1 | /// 在layoutsubviews中修改view的y值。 |
UIAlertController
1 | /// 简单弹出一个提示框 |
UIImagePickerController
1 | _imagePickerController = [[UIImagePickerController alloc] init]; |
Summary
if、else Vs Inherit
开发中遇到的很多相似的界面,很多开发者都会用复用,并用if、else来区分当前界面处理的是那种情况,在开发前期基本没有问题。但是一旦别人接收你的代码,再改需求的时候就会出现非常混乱的代码。所以这种情况建议分开,相同的逻辑可以放在基类中实现(业务代码除外,这里的通用处理指的是下拉刷新逻辑、谈提示的样式、Loading的弹出等和业务无关的代码)。