最近对于库的研究比较多,主要是想将其他的第三方核心库和项目进行分离,使得项目不过于依赖第三方库!
主要包含了Swift Framework中使用各种库的踩坑记录。
全局定义
为了解释方便在这里做一个全局的定义:
- A.framework表示我们创建的Framework,标准的Framework。
- A.h表示A.framework中的头文件。
- B.framework表示非标准的Framework文件。
- C.a表示静态链接库。
- M.xcodeproject表示Swift项目
- N.workspace表示一个工作空间
基础知识
项目结构如下所示:
1 | |--N.xcworkspace |
Embedded Binaries 和 Link Frameworks and Libraries 区别
When should we use “embedded binaries” rather than “Linked Frameworks” in Xcode?中说的很专业。
在项目中有这两个链接库的方式,而在Framework中只有Link Frameworks and Libraries,表示我们如果我们创建的库需要链接其他库的时候,最后打包的库并不包含链接的其他库,而是创建一个引用!这个时候你在项目中使用该库的时候还是需要链接该库所引用的所有相关库!在这里cocoapod可以很好的解决这种相关库的依赖问题。
举个🌰:我们创建A.framework,链接了一个第三方库B.framework和C.a库。我们需要在M.xcodeproject中使用A.framework。
如果项目和A.framework同属于一个workspace,那么需要在Embedded Binries中添加A.framework,在Build Settings -> Framework Search Paths和Library Search Paths中设置B.framework和C.a库的位置。
A.h文件解释
在创建Swift Framework的时候会自动创建一个A.h文件,这个文件其实就相当于静态库的头文件。
我们可以在这里面用@import UIKit;或者#import <UIKit/UIKit.h>方式来实现导入UIKit框架,表示这个库引用了UIKit的框架。
⚠️:这个头文件必须是public类型。
module.modulemap文件解释
我们创建一个标准的Swift Framework的时候,Framework的结构大致应该是这样的:
1 | |--A (二进制文件) |
下面我们讲解一下这个module.modulemap的用处。这个文件基本格式如下:
1 | framework module A { |
我们知道在Swift项目中使用一个库,最简单的方式就是import这个库,例如import Alamofire!framework module A指明了这个库的名称是A,umbrella header "A.h"指明了这个库的头文件是哪个。
Swift Framework 链接其他库
链接非标准的B.Framework
如果你链接一个非标准的Framework,里面没有module.modulemap文件,你是无法通过@import B;的方式来链接这个库的。
也就是说尝试在A.h文件中如下写法:
@import B;:编译器会提示错误:Module 'B' not found#Import <B/B.h>:编译器会提示错误:Include of non-modular header inside framework module 'A': 'B.framework/Headers/B.h'
⚠️但是第二个方式对于直接在项目中引用是没有问题的,在X-Bridging-Header.h中#Import <B/B.h>就可以。
其实在这里我们只需要为该Framework创建一个module.modulemap文件即可,内容如下:
1 | framework module B { |
链接C.a静态库
链接静态库比较简单,直接导入到项目中,并在A.h中#import "B.h"即可
⚠️:在A.himport的头文件都必须是public类型,即需要暴露的头文件。
举个🌰:我们想将GPUImage静态库引入,只需要在A.h中#import "GPUImage.h"即可(GPUImage.h及所有的相关头文件都设置成public)。
链接C++写的Framework
C++并不能直接被Swift和Objective-C使用,只能使用Objective-C++使用,这个时候我们需要创建一个.mm文件来使用这个库。
举个🌰:我们导入opencv.framework,并在Swift Framework中使用。
首先创建一个.mm文件(其实就是创建一个.m文件更改一下后缀名)。引入#import <opencv2/opencv.hpp>就可以了。
iOS — OpenCV and Swift这篇文章写的很好。
扫盲
下面介绍一下自己认为的错误。
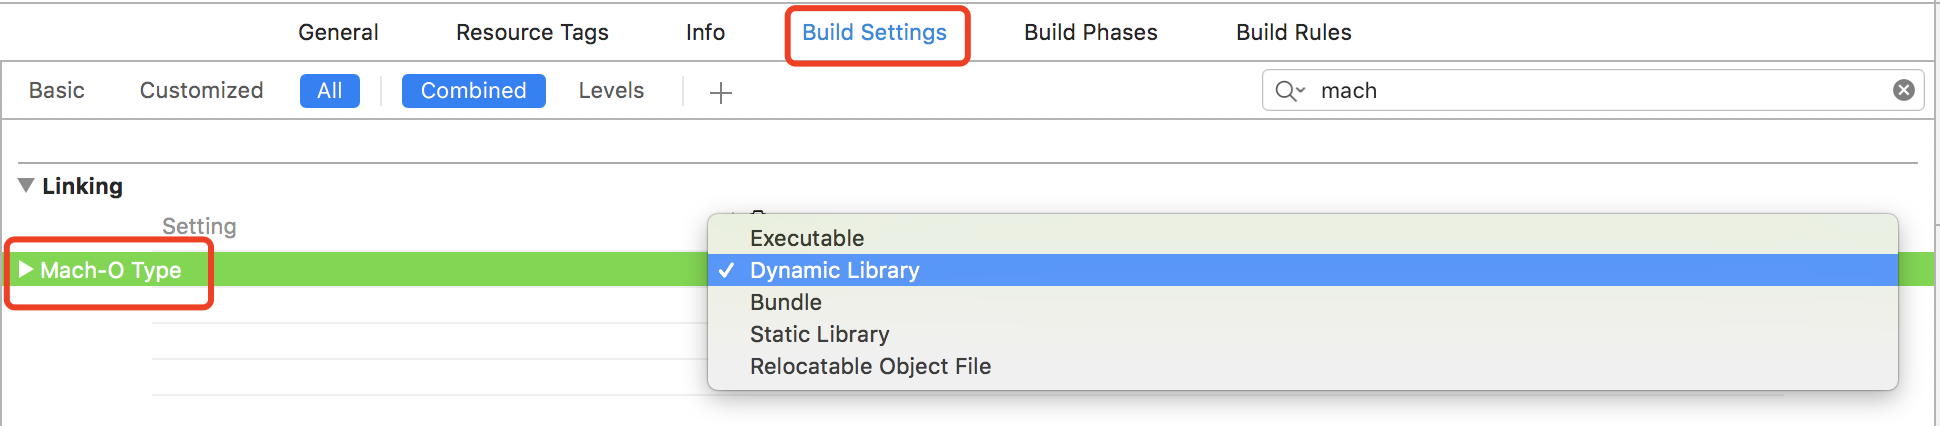
Framework一定是动态库么?
Framework可能是动态库,也可能是静态库,决定是掌握在Build Setting中的Mach-o Type选项。
例如ijkplayer虽然是以Framework结尾,但其却是静态库。
那么在项目中如何引入这样以Framework结尾的静态库呢?
由于是静态库,所以是直接链接到可执行文件中的,所以在解包ipa文件的Frameowks目录底下是看不到这个Framework的。
- Framework链接的静态库可以不用在项目中再次设置
Library Search Paths。 - Framework链接的动态库需要在项目中设置
Framework Search Paths。 - Framework中的Bundle需要单独拿出来,否则在运行的时候无法找到该Bundle。
以Framework结尾的静态库可以Embedded Binaries到项目中么?
不能!只能通过Link Frameworks and Libraries的方式进行链接。
由于静态库是直接编译链接到可执行文件中的,然后将其他资源文件以Bundle的形式放在放到ipa包中,所以不能Embedded Binaries到项目中,否则会出现编译,运行等都没有问题,但是Archive的时候会出现Found an unexpected Mach-O header code,did not contain a "archived-expanded-entitlements.xcent" resource。
Swift导入C文件
下面介绍如何在Swift库中引用C文件。其中最典型的就是CommonCrypto,Swift的Framework中不能添加桥接文件,添加之后会出现Include of non-modular header inside framework module 'xxx'.
解决方案
创建module.modulemap文件
这边我创建了两个,一个是模拟器下用的,一个是真机环境下的,分别放在同一个文件夹下CommonCrypto的两个目录中iphoneos和iphonesimulator。
最终存放在这两个目录中
${SRCROOT}/Sources/modules/CommonCrypto/iphoneos/
${SRCROOT}/Sources/modules/CommonCrypto/iphonesimulator/
- 模拟器:
1 | module CommonCrypto [system] { |
- 真机:
1 | module LPCommonCrypto [system] { |
有的人说可以用
${SDKROOT}来代替/Applications/Xcode.app/Contents/Developer/Platforms/iPhoneSimulator.platform/Developer/SDKs/iPhoneSimulator.sdk有的直接写
/usr/include/CommonCrypto/CommonCrypto.h就可以,但是我这边只能写完整路径,不然找不到。
项目设置
在对应的Target的Build Setting中找到import Paths,修改键值为${SRCROOT}/CommonCrypto
CocoaPods配置
1 | # 路径选择 |
参考文章
总结
其实从#import <UIKit/UIKit.h>这个就可以知道如何在一个Swift Framework中引入其他的框架。
合并通用的 Framework || Static Library
命令详解
lipo: create or operate on universal files
lipo -create [Framework1] [Framework2] -output [Universal.framework/Universal.a]
举个🌰
Framework
- 1⃣️选择
Generic iOS Device和任意一款模拟器分别编译一下。
success之后,在build/Debug-iphoneos/和build/Debug-iphonesimulator目录下分别有一个文件夹:GPUImage.framework。
- 2⃣️执行下面命令开始合并:
1 | lipo -create .../Debug-iphoneos/GPUImage.framework .../Debug-iphonesimulator/GPUImage.framework/GPUImage -output .../GPUImage |
Static Library
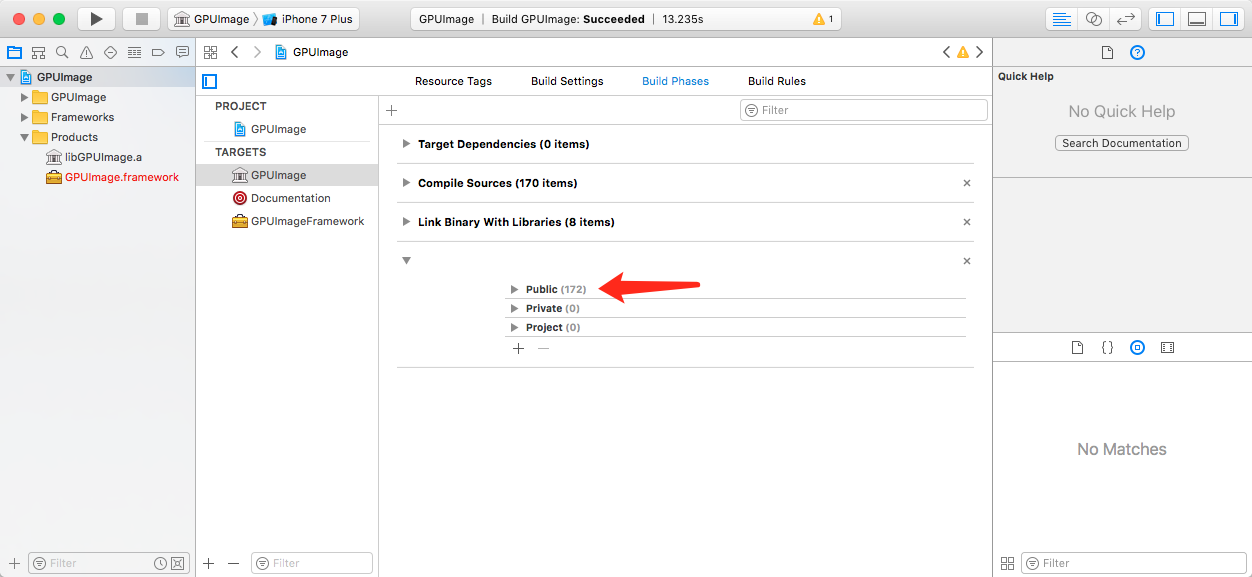
首先需要将头文件暴露出来,将project中的头文件拖拽到public中:
- 1⃣️ 然后选择
Generic iOS Device和任意一款模拟器分别编译一下。
success之后,在build/Debug-iphoneos/和build/Debug-iphonesimulator目录下分别有一个文件一个文件夹:libGPUImage.a和usr,usr中就是头文件。
- 2⃣️ 执行下面命令开始合并:
1 | lipo -create .../Debug-iphoneos/libGPUImage.a .../Debug-iphonesimulator/libGPUImage.a -output .../GPUImage.a |
- 3⃣️ 查看是否执行成功:
lipo -info GPUImage.a
Architectures in the fat file: GPUImage.a are: armv7 x86_64 arm64
- 4⃣️ 将
GPUImage.a和usr拖入项目中,然后在xxxx-Bridging-Header.h中添加#import "GPUImage.h"就OK了。
Errors
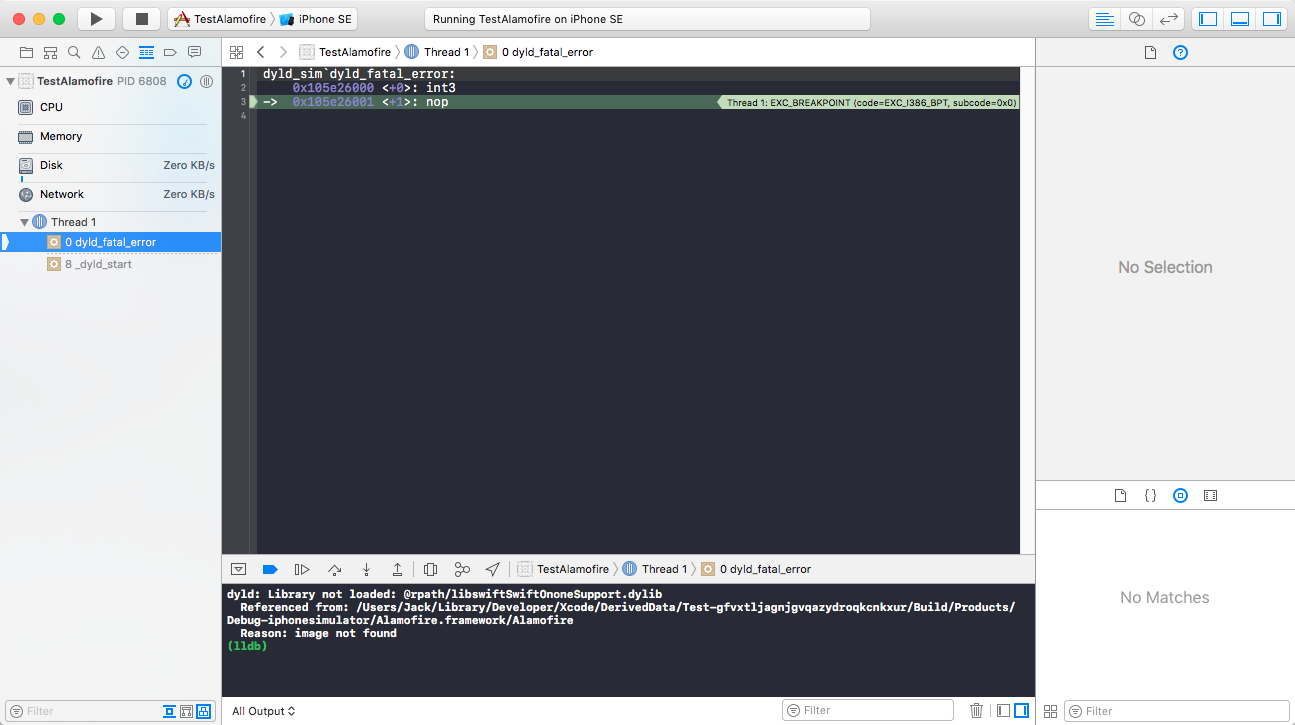
dyld: Library not loaded: @rpath/xxx.framework/xxx
1 | dyld: Library not loaded: @rpath/xxx.framework/xxx |
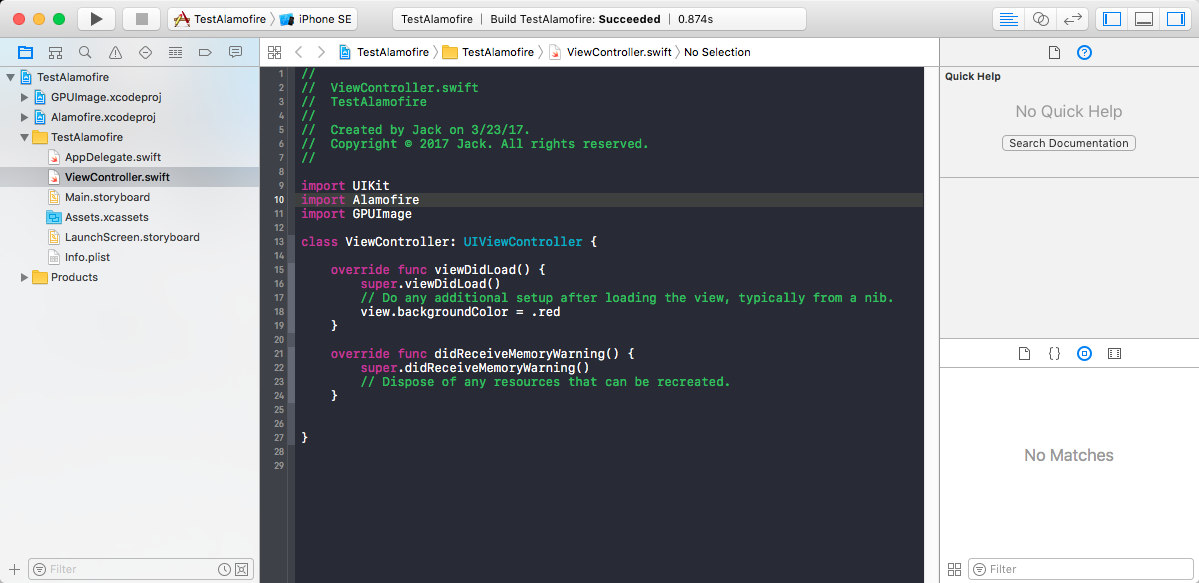
我们用Alamofire(Swift)和GPUImage(Objective-C)为例导入到一个Swift项目中。
❌错误演示1
在一个workspace中添加Alamofire和GPUImage,然后链接这两个库。
编译是没有问题的,但是一运行就出现了上述的问题:
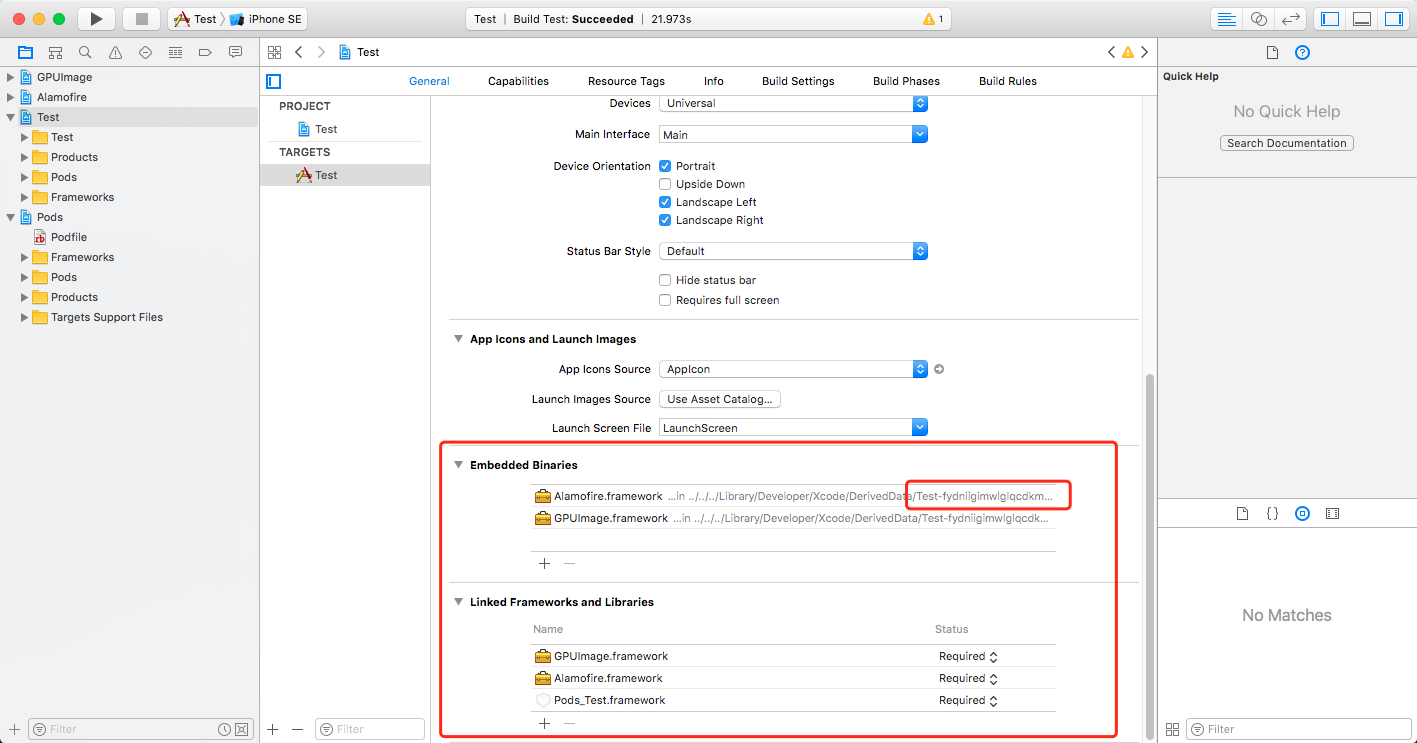
❌错误演示2
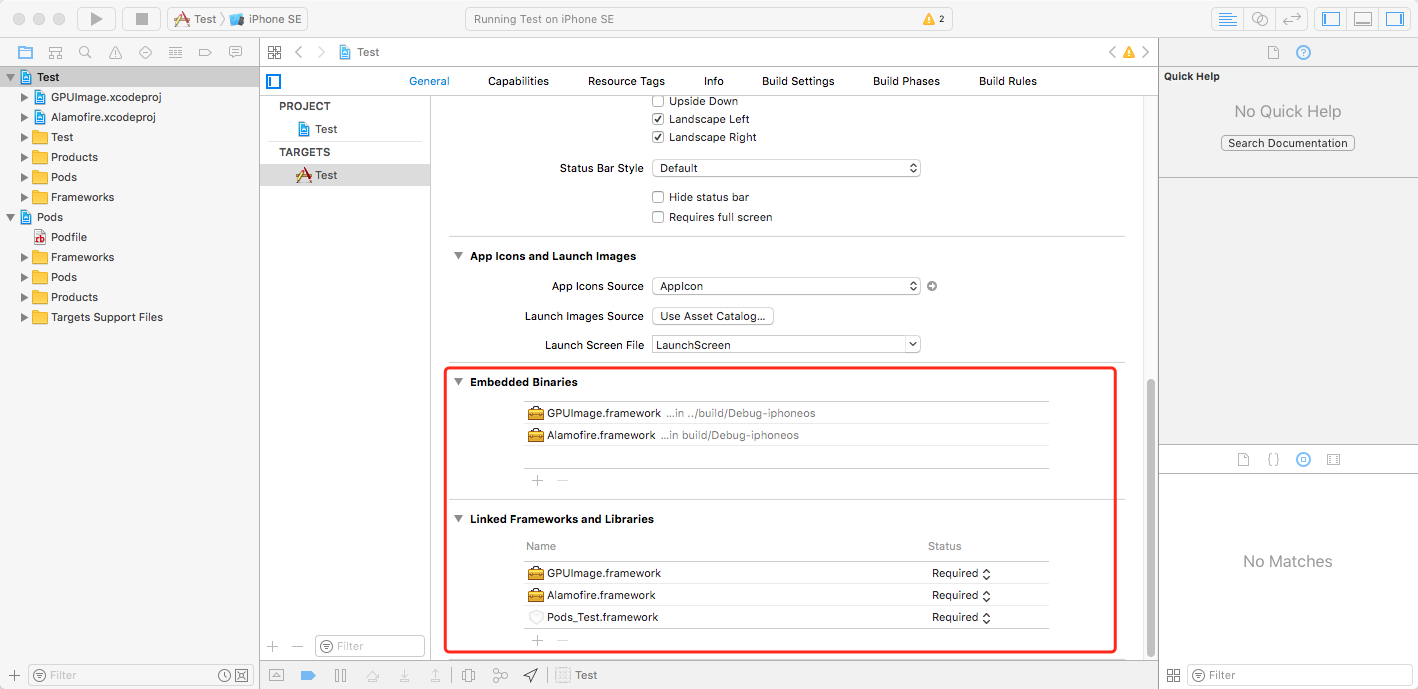
在一个workspace中添加Alamofire和GPUImage,然后Embedded Binaries这两个库。⚠️查看这拖拽库的位置和添加方式。
编译运行都是没有问题的,但是在Embedded Binaries中显示的路径是一条带有随机字符串的库,一旦用Git提交代码,别人就用不了,因为路径不同,所以找不到库。
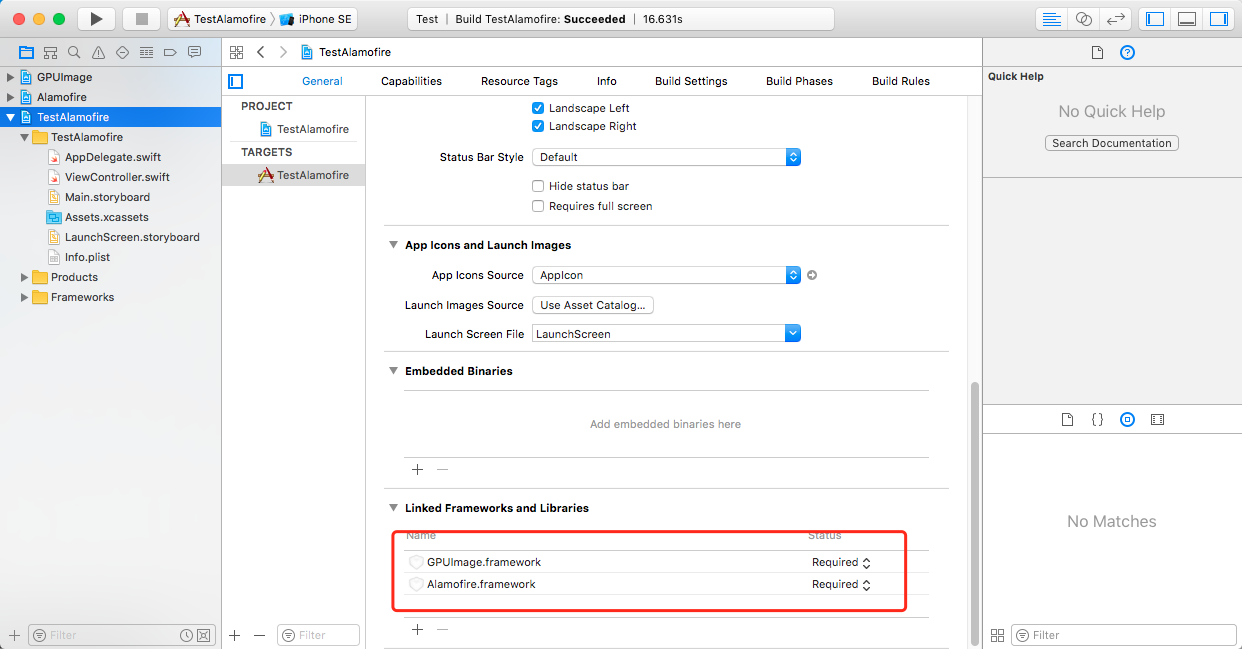
✅正确演示
在一个project中添加Alamfrie和GPUImage(⚠️添加的位置是在这个项目里面),然后Embedded Binaries添加这两个库
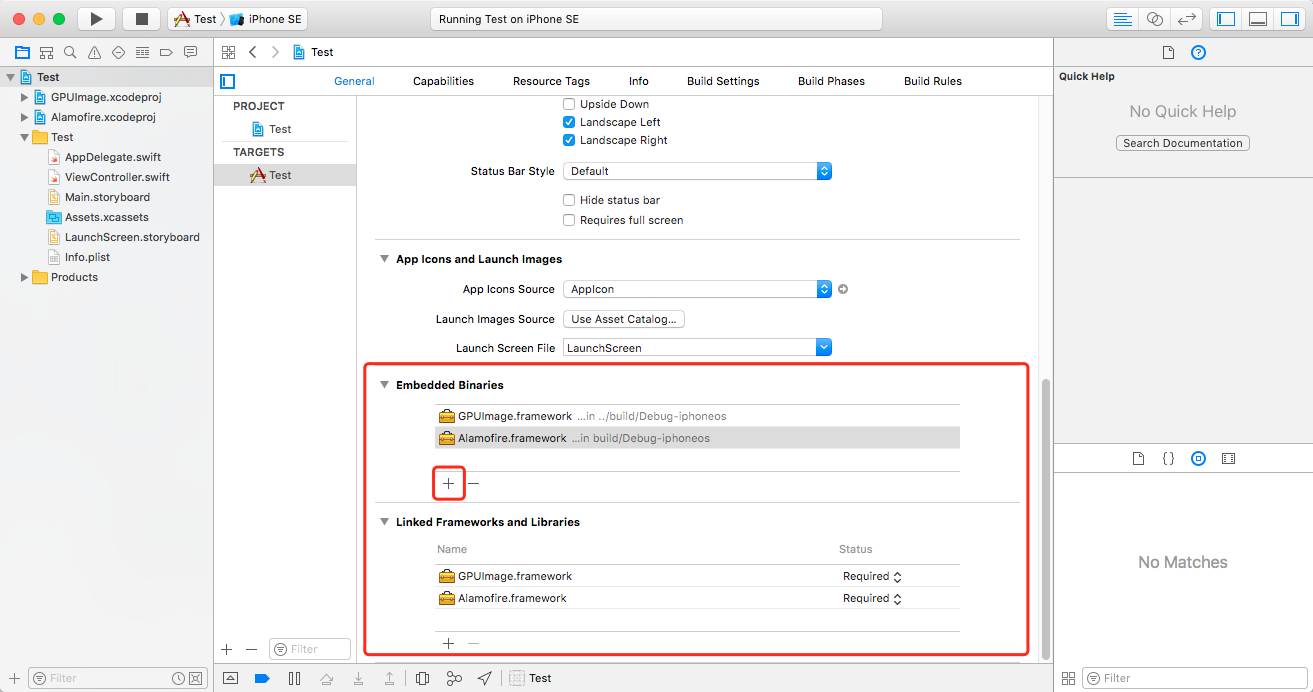
编译运行,完全没有问题:
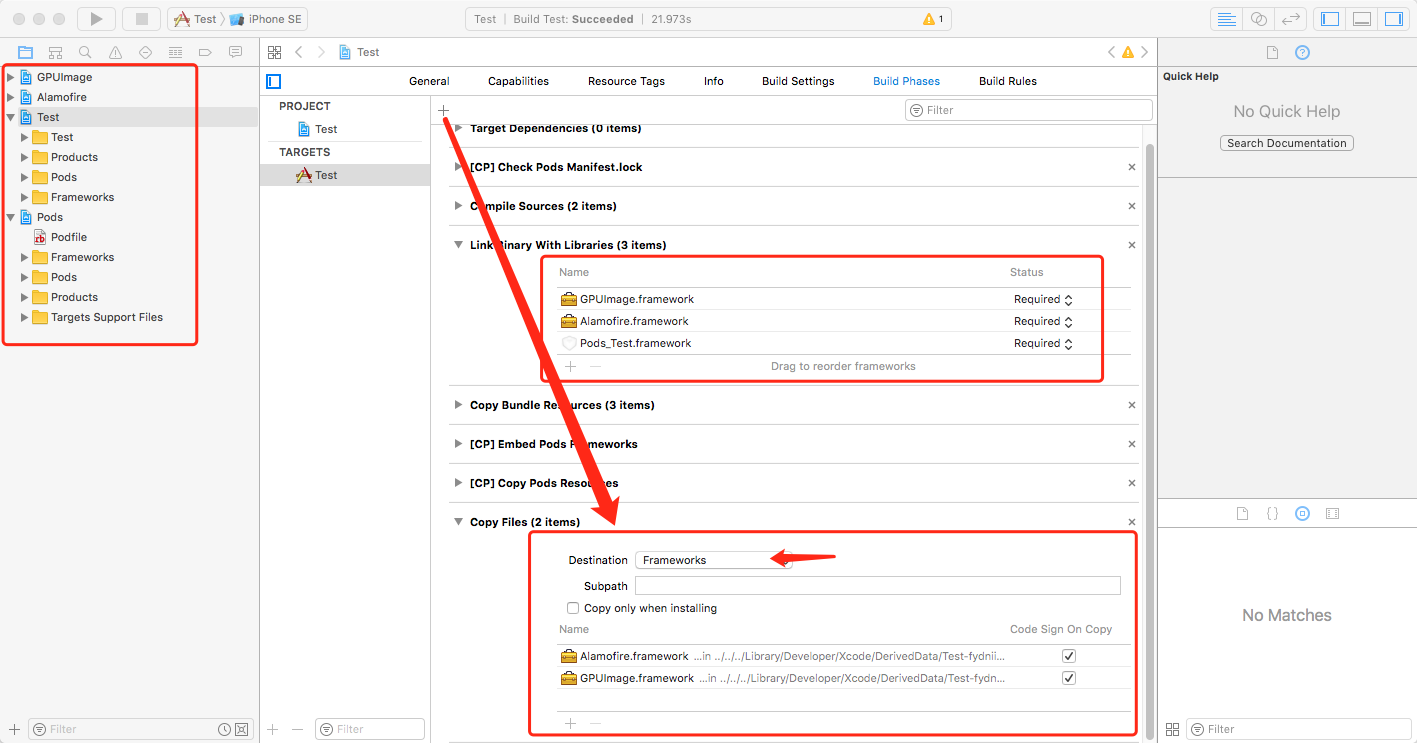
✅GPUImage官方讲解导入库
Adding this as a framework (module) to your Mac or iOS project
Xcode 6 and iOS 8 support the use of full frameworks, as does the Mac, which simplifies the process of adding this to your application. To add this to your application, I recommend dragging the .xcodeproj project file into your application’s project (as you would in the static library target).
直接拖入到
.xcodeproj,而不是.xcworkspace中。
For your application, go to its target build settings and choose the Build Phases tab. Under the Target Dependencies grouping, add GPUImageFramework on iOS (not GPUImage, which builds the static library) or GPUImage on the Mac. Under the Link Binary With Libraries section, add GPUImage.framework.
This should cause GPUImage to build as a framework. Under Xcode 6, this will also build as a module, which will allow you to use this in Swift projects. When set up as above, you should just need to use import GPUImage to pull it in.
You then need to add a new Copy Files build phase, set the Destination to Frameworks, and add the GPUImage.framework build product to that. This will allow the framework to be bundled with your application (otherwise, you’ll see cryptic “dyld: Library not loaded: @rpath/GPUImage.framework/GPUImage” errors on execution).
✅正确在.xcworkspace中添加库(常见于cocoaPods)
和上面一样,直接拖到对应的project中。
⚠️
Test项目是后来更新的图。